Category Archives: software

Review of Itead Sonoff Intelligent WiFi Socket

The intelligent WiFi mains socket is a device which is inserted into the original mains plug and has a mains socket itself. The mains output of the device can be controlled and switched on/off over an Internet connection.

The Itead Sonoff smart socket caught me with its simple design and with the possibility to upload custom firmware. The 10 amps socket is controlled by the WiFi capable ESP8266 microcontroller. ESP8266 is the leading platform for budget IoT devices. Its SDK is free and is well documented. It has built in WiFi, TCP/IP stack, free compiler and tools.

The device is produced by ITEAD studio, based in Shenzhen, China, website https://ww.itead.cc. The wiki product page is https://www.itead.cc/wiki/S20_Smart_Socket. In the Downloads section of this page https://www.itead.cc/wiki/S20_Smart_Socket#Downloads you can find the product schematics.

The socket comes in EU, US, UK, and China versions. This review covers the EU version of the socket, however most of the statements should be valid for the other versions.

The device comes packed into a solid cardboard box. The box is custom for the version of the smart socket and clearly shows how the specific plug looks like.

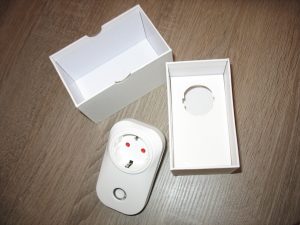
the box in which the socket is sold

The box in which the socket is sold


The box looks quite luxurious from inside. There is a cardboard piece which supports the plug and is probably also customized for the version of the socket as on this piece there is a profile of an EU plug.

the socket unboxed

The socket unboxed

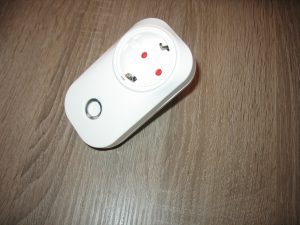
The external look shows a well built plastic case. The touch of the socket feels quite solid like an expensive device. The holes of the socket are fitted with child protection. There is a single button on the front of the socket.

front of the socket

Front of the socket

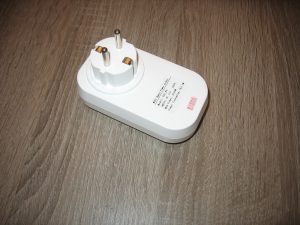
On the back of the socket there is an adjunct plug. On the plug there are explicit marks for L (line), N (null) and ⏚ (ground). A warranty seal with red Chinese inscription covers a hole with a screw which allows dismantling of the socket. A label reads:

WiFi Smart Power socket
Model: S20_EU
Input: AC 110 – 240V
Max Power: 2000W
Power Consuming: ≤ 0.3W

If we are not catchy for the funny English, the label is quite informative. As there is quite a wide voltage range, it seems the same schematics are used for all versions of the socket, and probably S20_EU is the EU version of the socket, S20_US is the US version of the socket, S20_UK is the UK version of the socket and S20_CN is the China version of the socket. The mains frequency 50 Hz or 60 Hz is not stated, as it is probably not important for the pulse switching power supply.

back of the socket

Back of the socket

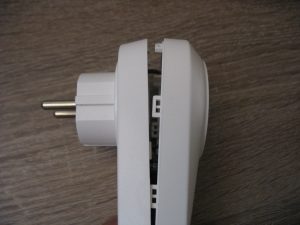
Now let’s look what is inside. We remove the warranty seal and undo the screw. Once you have undone the screw, there are several plastic locking fingers which have to pried

the socket pried from the side

The socket pried from the side

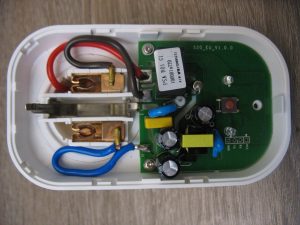
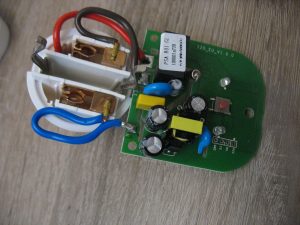
The firs look inside shows the wires are welded to the plug with electrical current. The pros for such welding are the high temperature and corrosion stability of the welding. The cons are that if the control of the welding is not good, weak electrical connection may occur.

The wiring looks quite neat. There is no foreseeable chance of a wire to melt down its isolation and to short circuit another wire, or a conducting surface to mechanically touch another conductive surface with the opposite potential. There are springs which create pressure for good electrical contact between the socket and the plugs which will be inserted. The discrete electronic components are well spaced from one another.

the front of the socket opened

The front of the socket opened

There is an inscription on the board which reads S20_EU_V1.0.0 . After all it seems that they use different boards for the EU, US, UK and China variants.
On the electrical relay there is a label which reads:

PSA B01 GL
100001a720
p/w: WWJG000627

The first line looks like a software version. The second line looks like a MQTT ID of the unit, and the third line is either a part number, or a password which allows access to the unit or with which the unit accesses a server.

The electronic board can be easily separated from the enclosure after undoing the two screws which support the board. The third screw which supports the board is the screw which is used to open the case of the socket and it has already been undone.

The socket board extracted

The socket board extracted

The power cables are soldered to the board. This is a point where weaknesses can appear, but with good control of the soldering this is OK. The cables conveniently keep the shape they had while in the enclosure, thus making the assembly to be easy.

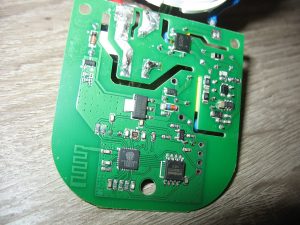
if we look at the back of the board, we see insulation channels cut in the board which keep the low voltage part of the board from the high voltage part. The power lines on the board are tinned in order to carry more current.

the back of the extracted socket board

The back of the extracted socket board

On the bottom we can see the ESP8266 chip with a label

ESP8266EX
482015
P48A17

The WiFi antenna can be seen in the bottom left of the picture.
In the bottom right can be seen an 8 Mbit, i.e.1MB, serial flash with label

winbond
25080BVSIG
1451L
.
This means the socket has plenty of space for firmware.

Let’s return to the front of the board.

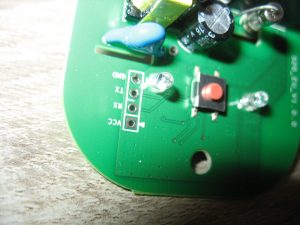
serial port, programming

The serial port of the board

To the right of the button there is a RGB LED, which is used to indicate the status of the smart socket. To the left of the button there are 4 lines VCC, RX, TX and GND which can be used for programming. The button itself is connects GPIO0 of ESP8266EX to the ground, so when the board is powered while the button is pressed, ESP8266 enters programming mode and new firmware can be flashed.

In the upper right corner we can see a 10 A fuse which is meant to protect the high-power circuit in case of current overload.

Finally let’s look at the power relay.

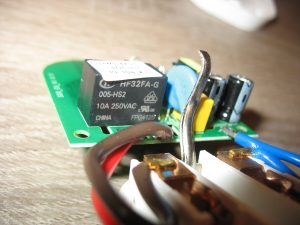
the relay of the socket, HF32FA-G, 10A, 250VAC

The relay of the socket

The relay has a label
HF32FA-G
005-HS2
10A 250VAC
CHINA FP0412B

The 10A of the relay give a little safety factor of 10% over the advertised switching power of 2000 W for 220 V mains voltage. To stay on the safe side, I would use the power socket for loads of up to 1000 W.

I purchased the socket from Aliexpress https://www.aliexpress.com/item/Itead-Sonoff-Wif-Wireless-Remote-Control-Switch-Smart-Home-10A-16A-Universal-intelligent-DIY-Timer-Switch/32760053192.html , for $16.70, with shipping via Singapore Post for $1.73. The item was dispatched and delivered very quickly.

If you want to gain experience with ESP8266 there is a free SDK, documentation, cheap hardware modules and plenty of programming examples freely available in Github and other sites.

How to update Fedora 19 on Marsboard A10

On my Marsboard I ran several times into the problem that when I started

yum update

after a reboot on finishing the update, my Marsboard wasn’t booting Fedora.

The problem was that the kernel packages were replaced with new ones, and the u-boot bootloader couldn’t cope with the situation. Probably the situation can be handled, but for now the safe way of updating the Fedora 19 on Marsboard A10 is

yum --exclude='kernel*' --exclude='uboot*' --exclude='arm-boot*' --exclude='dracut*' update

Why I do not advise to put the exclude directives in the yum.conf file? Because I tried it and the kernel became updated regardless of the exclude statements in the main section of the yum.conf file.

You can create a script named for example yumpudate.sh in your home directory, which you can use to save you the effort to write or copy/paste the whole command line.

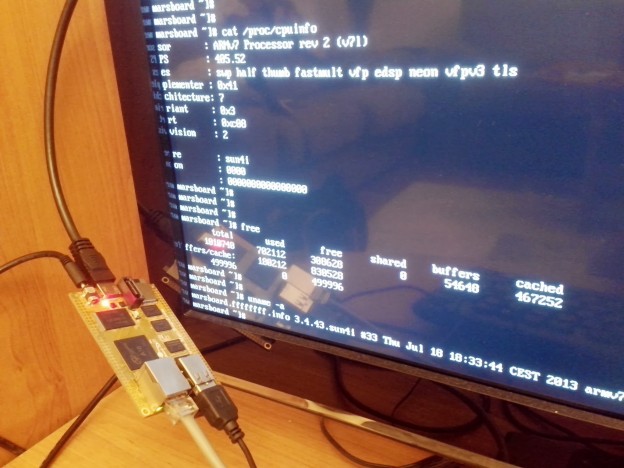
Fedora 19 running on Marsboard A10 on my TV

Running Fedora 19 on Marsboard A10

I recently purchased a Marsboard A10 development board from the Shenzhen based company HAOYU Electronics. The shipment to Bulgaria took less than 2 weeks via Hongkong post. On the Marsboard’s site there are some links to software, which can be used, a wiki page, and a forum about the board, however I had to successfully deal with some troubles when trying to use the solutions provided.

The board is advertised as being open, however not all issues about compilation and installation of software are clearly explained. Some images were not able to boot, the provided versions of the software were too old, e.g. Android version 4.0.4, Ubintu 12.06. The Linaro ubuntu distribution from the downloads page of Marsboard web site was running at very low frequency, with no change under heavy loads, probably due to poor bootloader configuration.

I noticed in this post that a Fedora 19 distribution for Cubieboard and other ARM boards was released. Cubieboard is very similar to Marsboard. I decided to try to adapt it to Marsboard A10.

As described in the  README file of the distribution, after the image is copied to an SD card, a script select-board.sh from the boot partition must be run, in order to install the u-boot bootloader and the boot configuration for the particular board:

cd ~/Downloads/Marsboard
wget http://scotland.proximity.on.ca/contrib-images/hansg/Fedora-19-a10-armhfp-r1.img.xz
wget http://scotland.proximity.on.ca/contrib-images/hansg/README-F19
xzcat Fedora-19-a10-armhfp-r1.img.xz >Fedora-19-a10-armhfp-r1.img

Now make sure the SD card on which you want to install the image has volume least 8 GB, that the SD card is inserted in the reader,  and that it is /dev/mmcblk0, now copy the image to the SD card

dd if=Fedora-19-a10-armhfp-r1.img of=/dev/mmcblk0 bs=4096 count=1926144
sync

The sync-ing flushes the cached information cached in memory to the physical medium. You may notice that it takes time, as a big part of the file was cached in the memory. After the sync command finishes, take out and re-insert the SD card. If you do this before the sync command has finished, the information saved on the SD card will become corrupt.

The problem was that the Marsboard board was not present in the list of the boards. I had to compile u-boot for Marsboard A10, accommodate the configurations for Marsboard, create a sub-directory for Marsboard under the boards/sun4i directory, and add the Marsboard profile in the select-board.sh script.

For each board with sun4i architecture there is a directory boards/sun4i/BOARDNICKNAME, where BOARDNICKNAME is the nickname of the board as defined in the select-board.sh script, used for identifying the board. There are u-boot.bin and sunxi-spl.bin files, which are part of u-boot, BOARDNICKNAME.fex file, with configuration parameters for the board, and a script.bin file, which is produced from BOARDNICKNAME.fex file using the fex2bin tool received from

mkdir -p ~/Downloads/Marsboard
git clone https://github.com/linux-sunxi/sunxi-tools
cd sunxi-tools
make clean
make
./fex2bin BOARDNICKNAME.fex >script.bin

So I’ll prepare a directory in which I’ll collect the files needed:

mkdir ~/Downloads/Marsboard/f19-boards-marsboard

Follow the instruction in the How to compile u-boot for Marsboard A10 article. After the compilation, copy the needed files in the prepared directory above:

cp u-boot.bin spl/sunxi-spl.bin ~/Downloads/Marsboard/f19-boards-marsboard

Now we need the marsboard.fex and script.bin files. From the marsboard-android-4.0.4-sdk.7z archive we can find the .fex file, as this post suggests.

cd ~/Downloads/Marsboard
wget http://www.haoyuelectronics.com/marsboard/marsboard-android-4.0.4-sdk.7z
7z l marsboard-android-4.0.4-sdk.7z
7z x marsboard-android-4.0.4-sdk.7z
find marsboard-android-4.0.4-sdk -name '*.fex'

There are 2 files which can be the corect files:

./marsboard-android-4.0.4-sdk/tools/pack/chips/sun4i/configs/crane/marsboard/sys_config1.fex
./marsboard-android-4.0.4-sdk/tools/pack/chips/sun4i/configs/crane/marsboard/sys_config.fex

By comparison of the files with the *.fex files from the uboot partition of the Fedora 19 image, e.g. we can find that sys_config1.fex is the correct *.fex file to copy to the board directory.

cp ./marsboard-android-4.0.4-sdk/tools/pack/chips/sun4i/configs/crane/marsboard/sys_config1.fex ./f19-boards-marsboard/marsboard.fex

Now translate the fex file to script.bin:

./sunxi-tools/fex2bin ./f19-boards-marsboard/marsboard.fex >./f19-boards-marsboard/script.bin

Remember that we left the SD card with the Fedora 19 image re-inserted, and the 1 and 3 partitions, labelled uboot and rootfs are mounted automatically to /run/media/$USERNAME/uboot and /run/media/$USERNAME/rootfs, where $USERNAME is the environment variable, which contains your username. Now copy the f19-boards-marsboard to the sun4i directory:

cp -R ./f19-boards-marsboard /run/media/$USERNAME/uboot/boards/sun4i/marsboard

Now what is left is to add marsboard in the select-board.sh script. This happens with only one line, marked below with ‘+’ to show the difference:

 BOARDS+=(wobo-i5             "Wobo i5 TV Box")
 BOARDS+=(xzpad700            "XZPAD700 7\" tablet")
+BOARDS+=(marsboard           "Marsboard A10")

 if [ "$1" = "--help" -o -z "$DIALOG" -a -z "$BOARD" ]; then
     echo "Usage: \"$0 <board>\""

In the real select-board.sh the + in the start of the line should not exist. Now sync the changes and umount the filesystems from the SD card:

sync
umount /run/media/$USERNAME/uboot /run/media/$USERNAME/rootfs

Now you can unplug the SD card from the card reader, plug it in the Marsboard, and enjoy your Fedora 19 installation.

Fedora 19 running on Marsboard A10 on my TV

Fedora 19 running on Marsboard A10 on my TV

You can find an archive with the files produced here: Fedora 19 on Marsboard A10 bootfiles

How to compile u-boot for Marsboard A10

The next instruction is for cross-compiling the u-boot bootloader for Marsboard A10 on Fedora 19 x86_64. With little modifications it should be able to work with other versions of Fedora, and to compile u-boot for another ARM board, e.g. Marsboard A20, ot Cubieboard.

Make sure the arm-linux-gnu toolchain is installed

yum install gcc-arm-linux-gnu binutils-arm-linux-gnu

My exact versions of those 2 packages are

# rpm -qa | grep arm-linux
gcc-arm-linux-gnu-4.7.2-2.aa.20121114svn.fc19.1.x86_64
binutils-arm-linux-gnu-2.23.51.0.3-1.fc19.x86_64

Please note that I tried the arm-none-eabi toolchain, but I encountered a problem during the cross-compilation. The cross-compilation was failing with segmentation fault, so I switched to arm-linux-gnu toolchain.

The command line of the instruction from the wiki How to compile the Allwinner A10 u-boot

git clone git://github.com/hno/uboot-allwinner.git

is not working, as the uboot-allwinner repository was removed.
I found that in the main u-boot repository there was a recent addition of Marsboard A20. The Marsboard A10 configuration for u-boot was present too. So I cloned the repository locally:

mkdir -p ~/Downloads/Marsboard
cd ~/Downloads/Marsboard
git clone git://github.com/hno/u-boot.git
cd u-boot

According to the README file in the u-boot root directory, after I found that the name of the board is Marsboard_A10 in the u-boot configuration lists, the next instructions had to compile u-boot:

export CROSS_COMPILE=arm-linux-gnu-
make Marsboard_A10_config
make clean
make

Don’t forget the trailing dash ‘‘ of the arm-linux-gnu- string which is put into the CROSS_COMPILE variable.

If everything compiled fine, you’ll have the u-boot.bin file in the root of the u-boot tree, and sunxi-spl.bin in the spl/ directory.

How to change Firefox encoding

In Firefox 23, go to the main menu -> View -> Character Encoding, and choose the encoding which you need.

I must say however that the cases, in which I have to use this option nowadays, are extremely rare. This is thanks to the wide use of Unicode, which replaces 8-bit the characters with 16-bit, thus making unnecessary the unreliable language detection.